
In brief: defining and initialising a workflow, entering workflow parameters, viewing workflow and its status
Accessibility
The use of workflows on a record is subject to the management of the rights of the connected user. The availability of a workflow on a table depends on the configuration of the application.
Definition
A workflow can be considered and represented as a sequence of activities on a record or a set of records. The behaviour of a workflow depends on its parameters, for example: number of steps, fields available or blocked at a workflow step, execution of sequences in parallel or in sequence, electronic signatures required.
Initiating a workflow
- Click on a record and then on the ‘create and start a workflow’ icon.
- Select the workflow repository you wish to launch if there are several configured on this table.
- Click on Continue at the bottom right.
- Depending on the configuration and your rights, choose the signatories for the next steps.
- Add an approval deadline.
- Add a number of days to alert the signatory(ies) from a certain date depending on the approval deadline.
- Add a comment if necessary.
- Click on Continue at the bottom right.
- Enter your password (if electronic authentication is used) to sign and start the workflow.
- Once the step has been validated, a message is displayed at the top of the home screen stating that Workflow Generation has been completed. An automatic email is sent to inform you that the workflow has been generated.
Information
If a table does not have a workflow, the ‘create and start a workflow’ icon does not appear. Creating/starting a workflow on a record depends on the workflow settings made in the GxpManager administrator interface (configurator). If necessary, back-ups and people to be notified must be set up in the administrator interface. Note that you can go back to ‘choice of repository’ and/or ‘form’ before signing definitively. In order to comply with regulations, it is no longer possible (from version 7.5.13) to store passwords automatically, either via the browser or via an extension, in the workflow signature mode.
Entering workflow parameters
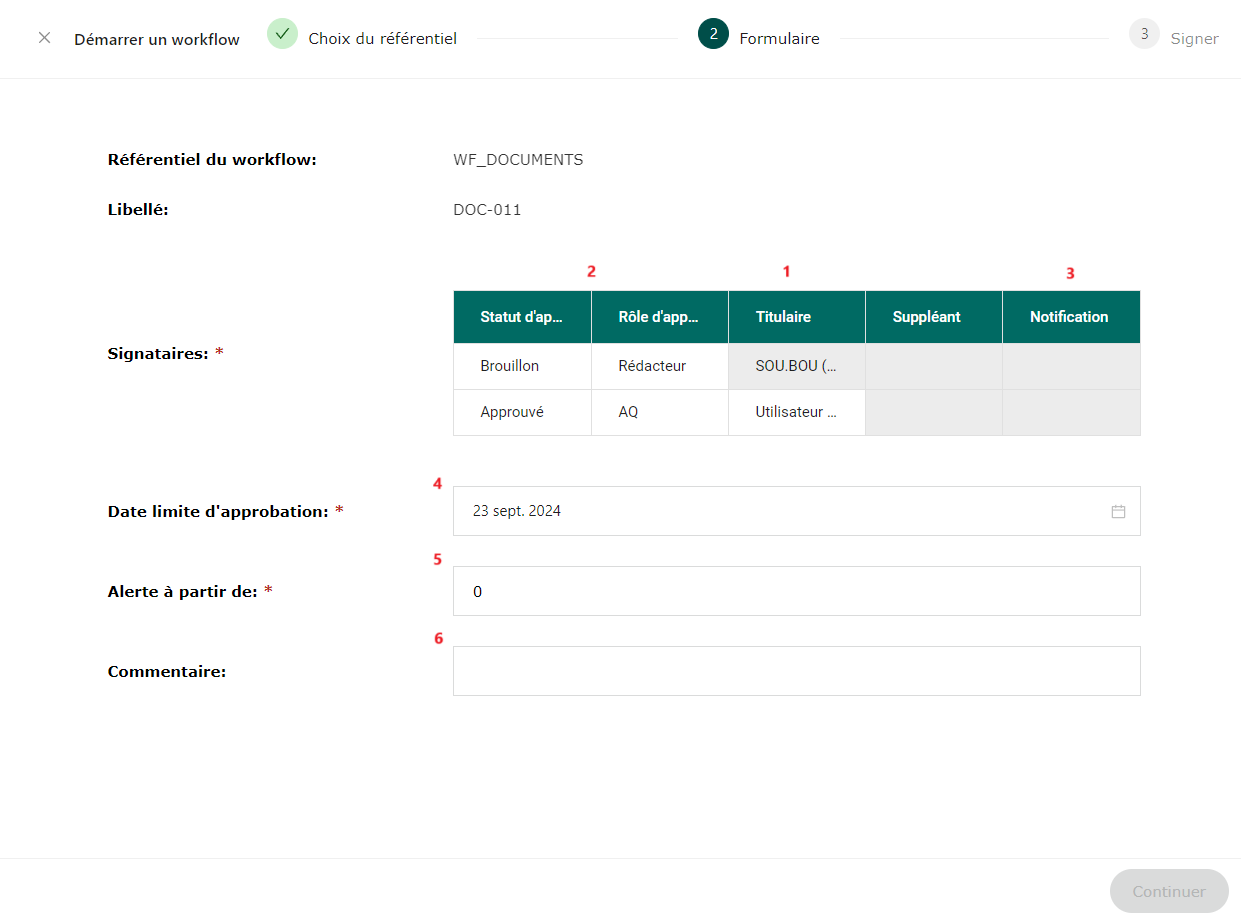
- The first parameter to be defined concerns the holders, i.e. the people who will have to carry out a workflow step, with an electronic signature if required by the settings. Only people with access to the database can be selected from the drop-down list.
- The status and approval role are defined by the workflow settings, and the name or group of signatories must be specified for each role when the workflow is initialised. By configuring the workflow (from the administrator interface), it is possible to perform a parallel signature. This allows 2 users to sign a workflow if they have previously been defined as signatories. It will only be possible to move on to the next stage once both signatories have signed. You can define a deputy or back-up authorised to sign the workflow to validate the stages.
- Notification allows a defined person who is not a signatory to the workflow to be notified by email.
- You need to set a deadline for workflow approval. A calendar is available at the bottom right of the screen, just select a date.
- It is also possible to set up an alert a few days before the workflow approval deadline in order to receive a reminder.
- You can enter a comment. This is useful for single-step workflows.
Information
If the fields linked to the signatories are not completed, a message indicates that the fields are mandatory. If this step is not completed, it is not possible to validate and initiate the workflow; the ‘Continue’ button is greyed out.
Workflow visualisation and status
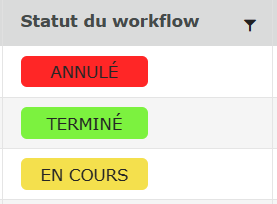
The different statuses (in progress, cancelled, completed or empty if no workflow has been started) of the workflows can be seen in the ‘Workflow status’ column in the table of the associated record. The home screen also lists the workflows you need to sign.
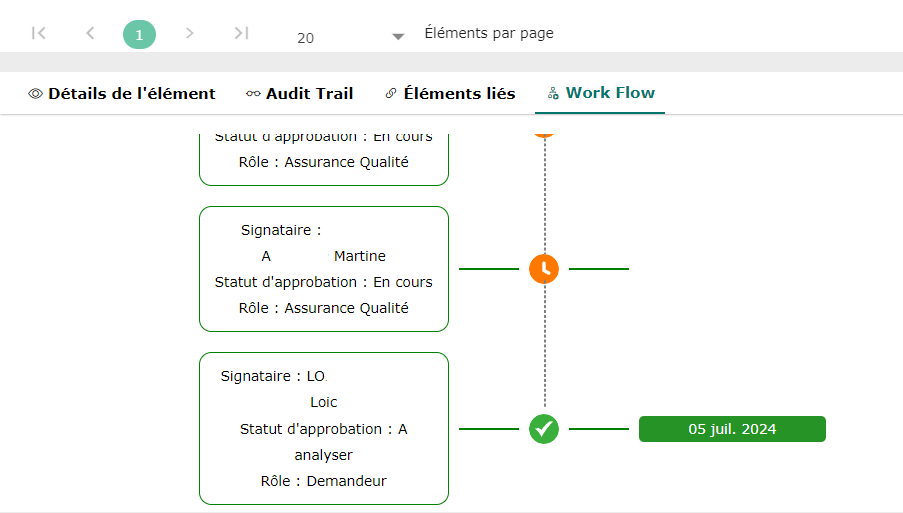
You can also view the workflow status via the bottom screen in the Workflow tab, after selecting a record.
Workflow progress from the grid
To continue a workflow, the user designated during configuration can select the element with a workflow in progress and then :
- Click on ‘Sign the workflow’.
- The form will open, then click on the ‘Validate and Sign’ button.
- A new window opens, in which you can choose to ‘Approve’ or ‘Reject’ (if you reject, comments are compulsory). Click on ‘Continue’.
- After approval, the change in workflow status is now visible in the ‘Workflow status’ column of the associated record table. An automatic email notification is sent following workflow approval.
- When a workflow is rejected, the operator in step N-1 and the people included in the steps preceding the rejection receive an email notification.